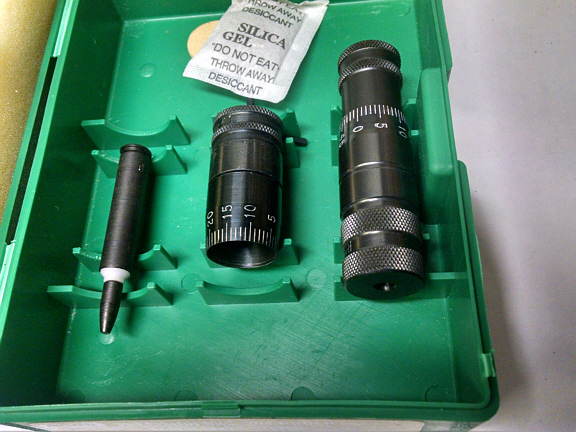
The body of the tool reminds one of a short piece of threaded water pipe that is capped at one end. When I say short, I mean about two thirds the length of the case you are working with. Simply drop a case (loaded or empty), into the body, primer end first and about one third of the case will protrude from the open end of the body.
The tool then includes two oversized caps, used independently, that thread down over the exposed neck of the case. One cap, referred to as the Headspace Nut, is designed to stop at the shoulder of the case while the other cap, the Land Nut, is designed to stop against the ogive of a seated bullet.
The Body of the tool is marked along the length in increments of .050 inches, which correspond with marks around the circumference of the caps which are marked in .001 inch increments.
Placing a case into the Body and threading the Headspace Nut down over the case will provide the headspace measurement when the Nut comes in contact with the shoulder of the case. Simply read the marks to determine your headspace measurement, which will be the minimum American National Standards Institute (ANSI) standard for your caliber, plus x number of thousandths read from the Headspace Nut.
If both the zero on the Body and the zero on the Headspace Nut, line up then we are at the ANSI minimum, which in the 220 Swift is 1.8060 inches. A fired case from my Swift, placed in the Body and capped with the Headspace Nut threaded down to touch the shoulder, provides a reading of .003. In other words, my chamber is .003 longer than the ANSI minimum or 1.8090.
The directions recommend setting the shoulder back .001 to .002 inches from the fired case length so that the loaded rounds will chamber readily under field conditions. Simple enough, thread the sizing die in until it touches the shell holder at full ram travel. Back the die out one full turn and size a fired case. Measure it, if the shoulder has not moved, screw the die in about a quarter turn and try it again. Repeat this procedure until a sized case measures .001 to .002 inches shorter than the original reading of 1.8090.
The benefit is that you reduce excess working of the brass by only moving the shoulder back just far enough to chamber easily and you reduce the risk of excess headspace, which can result in case separation and the dangers involved with that scenario.
Boy, that was a mouthful.
Ok, now for the bullet seating depth measurement, we switch caps to the Land Nut. The tool also includes a Freebore Assembly tool, which basically resembles a loaded round. This "loaded round" however, is completely adjustable and you don't even need a bullet puller.
The "Bullet" is threaded on to a nylon rod and then seated into a short tube that resembles a pistol case. The mock primer pocket has been enlarged to accommodate a hex key, which threads a set screw into the nylon connector, expanding it so that it is tight against the walls of the "case".
Nylon and steel combined do not offer a lot of sticking power. Seating the "Bullet" long and locking it into place with the hex key, is basically like seating a bullet too shallow. Place the "round" in the Body of the tool and thread on the Land Nut. Thread it down until it comes in contact with the ogive of the "bullet". They use the example of obtaining a reading like .300.
Since the nylon/steel does not offer much "sticking power", when chambered in your rifle, the nylon will be forced deeper into the case resulting in a perfect picture of your "bolt to land" measurement.
Now, carefully place the mock round into the Body of the tool, screw the Land Nut down over the bullet and slowly come to rest against the ogive of the "bullet". Read the marks and again, their example, you obtain a reading of .150. Make note of this number. Now to seat rounds .010 off the lands of your rifle, simply set your seating die so the resulting loaded round reads .140.
There are major drawbacks to owning such a tool. Now you have real numbers and can actually play with seating depths until the cows come home or the spouse comes looking for you, which ever comes first.
The bottom line is, the all so important headspace measurement no longer needs to be guess work. Find your chamber dimension and always adjust your sizing die accordingly. Bullet seating depths can be adjusted very easily and tested to find that perfect setting for your rifle/component combination.
Bill Wade